Almost everything can be done with the Terminal. At least that’s what the experts tell you. We find glorious “Terminal Hacks” which unlock some special features of the Mac. While for most part it’s fine not knowing, it wouldn’t hurt to know what exactly is going on behind those lines. Here’s a short crash course in using the Terminal, from a total newbie at that. Though I did do my homework, my less than exceptional knowledge of the Terminal might produce some errors in this guide. I have tried all the commands myself, so I don’t suppose anything should happen to your system, but do always backup before messing around with your system. Always.
Where’s the Terminal?
Use Spotlight to launch it, or you’ll find it in the Applications/Utilities folder.
Navigating the Terminal
The Terminal will generally launch with your home directory selected. To navigate down a folder, enter “cd foldername”. To navigate up to the containing folder, enter “cd ..”.
You can even directly navigate to a specific folder. Enter something like “cd users/myhomefolder/documents”. “cd ~” takes you back to the Home folder. The tilde key (~) stands for home folder. You can enter “cd ~/music” to go into the music folder within your home folder. If you just want to get the job done, Cmd+C any folder in Finder, and Terminal will paste in its path.
To know that you’re in the correct directory, hit “ls” to bring up a list of file names. I’m guessing ls stands for list. While you’re writing out commands, you might want to navigate that line itself. ^a to get to the start of the line, ^e to the end. Option+Click on any part of the line to move your cursor there. ^w (Ctrl+W) to backspace on any word, while ^u will clear out the entire line prior to the cursor. ^k is the inverse of ^u.
One important command: ^r will allow you to cycle through your history of commands. So if you can’t remember which command it was that enabled some setting (and you want to disable it now), this is a good way to go back in time. You can also type in history to get a list of your past commands.
Sudo
Very often one comes across this command ‘sudo’, which is generally appended at the start of a string. ‘sudo’ stands for ‘super user do’. The sudo command provides logging for individual commands run and some cases it has completely supplanted the root logon for administrative tasks. That is, it runs the command as root user, which is useful if the system isn’t allowing you to perform some tasks such as deleting, etc. To get into root mode, type in “sudo -s”. To test whether you’re in root mode, type in whoami (follow by a return, of course). To get out of root mode, type in exit.
Creating Symbolic links
Symbolic links allow you to create aliases that behave like normal files and folders. Which means you can have a symbolic link to a folder in your projects folder, that’s also present in your dropbox folder. Dropbox will think that symbolic link is a real folder, and sync the data up into its cloud, not realising that the files are in a totally different location. In this example, we’re going to create a symbolic link to Things’ database:
ln -s ~/Li- brary/Application\ Support/Cul- tured\ Code ~/Dropbox/Library/ Cultured\ Code
ln stands for link name, and -s stands for creating a symbolic link. The reason for those reverse slashes, is because there’s a space in the names of those folders. There are so many use cases for symbolic links, so be creative.
Nano: The Terminal text editor
If you’re feeling extra geeky, you can bring out the Terminal text editor to create new text documents or edit existing plaintext files — all in monospaced font and UI straight out of the 80s. Simply type:
nano “my filename.txt”
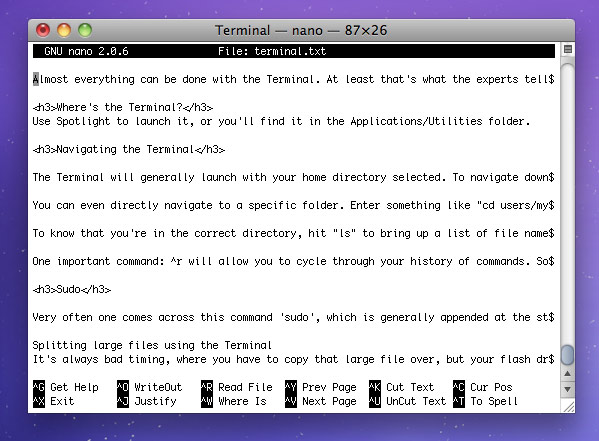
If it finds a matching filename in the current directory, it will open it. If not, it’ll create it for you. Navigating inside of the text editor is solely via the keyboard, where the bottom row shows you the available commands. It’s fun.
Splitting large files using the Terminal
It’s always bad timing, where you have to copy that large file over, but your flash drive is still in FAT32 format, or your email service doesn’t allow large files, or .
After navigating to the folder your file resides in, enter “split -b 10m filename.dmg part_”. Here ‘split’ is self explanatory; tells the computer to split the file. “-b 9m” stands for the file size. In place of 9 you enter whatever size in MB you want the file to split into. Replace m with k for kilobytes. Then comes the filename itself, and lastly “part_” is an appendage to the split files.
To join the files, “cat part_a[a-g]>filename.dmg”. I assume ‘cat’ stands for the house cat, which then specifies which files you need to rejoin. “[a-g]” is the last letter of the files that the previous step spits out.
Useful Terminal Commands
Every software release from Apple brings out some new terminal commands. I don’t know how they find these commands, but they always make their way into the Apple community. They’re usually just boolean commands, meaning you have a string of text with a YES or NO at the end. Either way enables or disables the feature.
Enable path bar.
If you want your Finder window titlebar to always show the directory structure, you can enable it using a single command:
defaults write com.apple.finder _FXShowPosixPathInTitle -bool YES
QuickTime X
With QuickTime X we lost all power over its preferences. Thankfully there are still some settings in the player; they’re just not accessible via a GUI.
Always hide titlebar:
defaults write com.apple.QuickTimePlayerX MGCinematicWindowDebugForceNoTitlebar 1
Unfortunately, this means you can’t close the movie window or minimise it.
Keep fullscreen while App Switching:
If you Cmd+Tab or somehow interact with another app while QuickTime X is playing something, it’ll automatically exit fullscreen mode. This command ensures your fullscreen stays intact.
defaults write com.apple.QuickTimePlayerX MGFullScreenExitOnAppSwitch 0
Autoplay movies:
If you’re tired of hitting the play button every time you launch a movie, this command will do the obvious.
defaults write com.apple.QuickTimePlayerX MGPlayMovieOnOpen 1
There are more commands for QuickTime X, if you feel the need.
List view stacks
If you’re not already using this feature, you’re missing out. Instead of the showy stacks or the extra large grid, you can have the best of both words, in a slick list-stack. Once you’ve enabled it, hit the + or – buttons on your keyboard to increase or decrease the icon sizes.
defaults write com.apple.dock use-new-list-stack -bool YES
Global text substitutions
If you want to enable all the text substitution features for every app that supports it, just blindly copy paste it in. On the other hand, if you want just one of the features enabled, read through the command and remove all that you don’t need. You don’t need this command really, since you can very well manually enable text substitution on a per app basis.
defaults write -g WebAutomaticTextReplacementEnabled -bool truedefaults write -g WebAutomaticDashSubstitutionEnabled -bool truedefaults write -g WebContinuousSpellCheckingEnabled -bool true
Dock tricks
The Dock responds well to terminal commands. You can move your Dock to the left or right by entering:
defaults write com.apple.dock pinning -string start
Replace start with end if you want it on the right. Replace with ” ” to restore position. You need to run a killall Dock for any of the settings to take action.
There’s also a command to make hidden application icons show translucent:
defaults write com.apple.Dock showhidden -bool YES
You can also add a free moving spacer to your dock icons by entering the command from this txt file.
And finally, to get the 2D dock:
defaults write com.apple.dock no-glass -boolean YES
Hide desktop icons
This one I’ve found really useful. With just one command all my desktop icons are always hidden from view.
defaults write com.apple.finder CreateDesktop -bool false
That’s it for now
We’ll continue posting cool terminal commands as and when they surface, but till then this list should do. There are a lot more commands, but most of them are for nerds (more so than you and me), or things that make your Mac look ugly. If you have any killer commands, shoot them into the comments and we could even add them into the article.